100 Years of CIGWELD

CIGWELD is an iconic Australian brand embedded in Australian history (CIG, MUREX, EMF, JB ARNOLD, COMOX, Australian Oxygen and Industrial Gases) and has been part of the welding industry for 100 Years (Est. 1922).

The journey of CIGWELD began in Australia on June 1st 1922 in Melbourne as JB Arnold; a manufacturing company specialising in gas welding and spray-painting equipment where the well-known COMET Branded Gas Welding and Cutting Torches was created. In 1935, JB Arnold then became a part of the Commonwealth Industrial Gases (CIG).

In 1923 E.M.F. Electric (Electro Magnetic Force) was founded to manufacture welding transformer machines. In 1937 EMF became the electric welding division of what would become CIG. CIG finally had a complete portfolio of both gas and electrical welding equipment. EMF also then started to manufacture Covered Welding electrodes for Stick Welding, known official as Manual Metal Arc Welding (MMAW).

Sixty-three years later in 1985, CIGWELD was formed as the equipment division of CIG which was the largest Australian manufactured of Welding Machines, Gas Equipment, Filler Metals and Safety products. At the time CIGWELD employed 700 employees in Australia with another 120 located in the Philippines.

From 1989, there were various transfers of the business (the Management Team (Comweld Group Pty Ltd) who brought CIGWELD from CIG, sold the business to Thermadyne Corporation USA, which later changed its name to Victor Technologies) and more recently in 2014 was bought by our current parent company ESAB-Colfax, now called ESAB Corporation, based in the USA.

From the advent of Oxy-Acetylene Welding (OAW), Manual Metal Arc Welding (MMAW), commonly known as STICK Welding to the invention of TIG welding and MIG welding, CIGWELD has actively brought these welding technologies to Australia, NZ and the Pacific Islands throughout its 100 year history.

With 100 years of industry leading experience, CIGWELD is looking to the future, to continue its leadership in the supply of the highest-level quality products and services to the next generation welders and fabricators, who will weld in the centuries to come.

CIGWELD Customers; share our past, are our present and will determine our future!

100 Years of Cigweld – A Brief History of the Brand

100 Years of CIGWELD

CIGWELD is an iconic Australian brand embedded in Australian history (CIG, MUREX, EMF, JB ARNOLD, COMOX, Australian Oxygen and Industrial Gases) and has been part of the welding industry for 100 Years (Est. 1922).

The journey of CIGWELD began in Australia on June 1st 1922 in Melbourne as JB Arnold; a manufacturing company specialising in gas welding and spray-painting equipment where the well-known COMET Branded Gas Welding and Cutting Torches was created. In 1935, JB Arnold then became a part of the Commonwealth Industrial Gases (CIG).

In 1923 E.M.F. Electric (Electro Magnetic Force) was founded to manufacture welding transformer machines. In 1937 EMF became the electric welding division of what would become CIG. CIG finally had a complete portfolio of both gas and electrical welding equipment. EMF also then started to manufacture Covered Welding electrodes for Stick Welding, known official as Manual Metal Arc Welding (MMAW).

Sixty-three years later in 1985, CIGWELD was formed as the equipment division of CIG which was the largest Australian manufactured of Welding Machines, Gas Equipment, Filler Metals and Safety products. At the time CIGWELD employed 700 employees in Australia with another 120 located in the Philippines.

From 1989, there were various transfers of the business (the Management Team (Comweld Group Pty Ltd) who brought CIGWELD from CIG, sold the business to Thermadyne Corporation USA, which later changed its name to Victor Technologies) and more recently in 2014 was bought by our current parent company ESAB-Colfax, now called ESAB Corporation, based in the USA.

From the advent of Oxy-Acetylene Welding (OAW), Manual Metal Arc Welding (MMAW), commonly known as STICK Welding to the invention of TIG welding and MIG welding, CIGWELD has actively brought these welding technologies to Australia, NZ and the Pacific Islands throughout its 100 year history.

With 100 years of industry leading experience, CIGWELD is looking to the future, to continue its leadership in the supply of the highest-level quality products and services to the next generation welders and fabricators, who will weld in the centuries to come.

CIGWELD Customers; share our past, are our present and will determine our future!

How does a welding helmet protect you?

How does a welding helmet protect you?

When you’re welding, eye & face protection is absolutely crucial. Welding means exposing yourself to intense heat, bright light, and harmful fumes, which can have very harmful effects on your face and body. Without safety gear, you put yourself at great risk, all while hindering your ability to work efficiently. If you’re about to embark on a welding project—whether professional or DIY—you must invest in a high-quality welding helmet. This protective helmet will be your first line of defence against the dangers of welding and will allow you to complete your projects stress-free. At Cigweld, we’ve done extensive research into the benefits of welding helmets. 

The Role of a Welding Helmet

A welding helmet is a crucial piece of safety equipment that protects welders from the hazards associated with welding. It covers the entire face and neck, shielding against harmful ultraviolet (UV) and infrared (IR) rays, flying debris, and intense light produced during the welding process. The core component of a welding helmet is the welding lens, which filters out dangerous rays and allows the welder to see the workpiece clearly. Welding lenses come in various shades, with darker shades providing greater protection. The right lens shade depends on the type of welding and the amperage used.

How Does a Welding Helmet Protect You?

A welding helmet will protect you from the following:

  • UV and IR rays: Prevents eye injuries such as arc eye and potential vision loss.
  • Bright light: Protects the retina from intense light, reducing the risk of temporary or permanent blindness.
  • Heat and sparks: Guards the face and neck against burns and injuries from flying sparks.
  • Debris and fumes: Prevents harmful particles and fumes from reaching the eyes and skin.

What Is Auto-Darkening?

One of the most significant advancements in welding safety technology is the auto-darkening welding helmet. Unlike traditional helmets, which require welders to flip the helmet up and down between welds, auto-darkening helmets automatically adjust the lens shade in response to the welding arc’s brightness. Auto-darkening has several benefits:

  • Convenience: Welders can wear the helmet at all times, increasing productivity and reducing exposure to harmful rays.
  • Safety: The lens automatically darkens within milliseconds when the arc is struck, ensuring constant eye protection.
  • Comfort: Reduces neck strain from constantly flipping the helmet up and down, making it easier to maintain focus and precision during welding tasks.

Crucial Safety Gear

As effective as a welding helmet is for protection, it shouldn’t be the only thing you’re using to protect yourself. To ensure maximum safety, you need to equip yourself with everything from welding gloves to safety goggles. Welding gloves protect your hands from heat, sparks, and sharp objects, while safety goggles shield your eyes from flying debris and sparks. You should also invest in quality hearing protection. Welding can be noisy, and prolonged exposure to loud sounds can damage your hearing—which is why you need earplugs or earmuffs to protect your ears.

All Weld & Good

When it comes to purchasing welding helmets and safety gear, trust Cigweld to provide high-quality products that ensure your safety and comfort. Cigweld offers a wide range of welding helmets, including the latest auto-darkening models designed to provide superior eye and face protection. We also offer a wide selection of welding gloves, hearing protection, and safety goggles, making us your one-stop shop for all your welding safety needs.

Investing in a reliable welding helmet and complementary safety gear is a crucial step toward safeguarding your health and enhancing your welding performance. Choose Cigweld today for top-notch protection and peace of mind.

How to Choose a Welding Gas Regulator in Australia

How to Choose a Welding Gas Regulator in Australia Matter

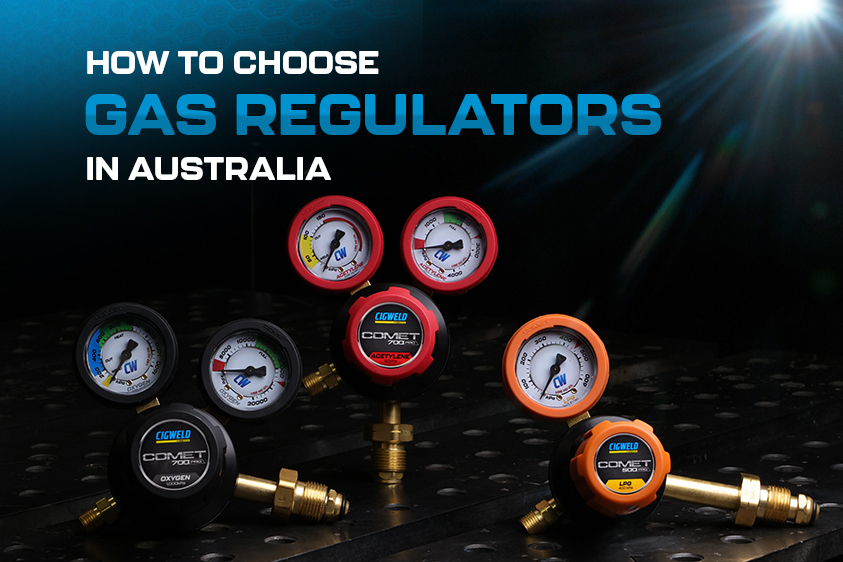
Selecting the right regulator starts with choosing one that is designed for your specific gas and provides the pressure or flow needed for the job. All gas regulators sold in Australia should be designed in accordance with AS 4267, with each gas type featuring a unique cylinder connection to prevent incorrect regulator-to-cylinder fitment. This guide explains how to select the correct regulator for oxygen, acetylene, LPG, argon, and CO₂, outlines safe installation practices, and identifies when regulator replacement is required.

Selecting the right regulator starts with choosing one that is designed for your specific gas and provides the pressure or flow needed for the job. All gas regulators sold in Australia should be designed in accordance with AS 4267, with each gas type featuring a unique cylinder connection to prevent incorrect regulator-to-cylinder fitment. This guide explains how to select the correct regulator for oxygen, acetylene, LPG, argon, and CO₂, outlines safe installation practices, and identifies when regulator replacement is required.

What a Gas Regulator does

A regulator performs two critical functions. They reduce the high pressure stored in the cylinder (often up to 20,000 kPa for oxygen, argon, and other inert gases) to a safe working pressure, whilst maintaining consistent pressure as the cylinder contents are used.

They also maintain consistent outlet pressure, which distinguishes a true regulator from a simple flow restriction device. This consistency helps keep cutting flames stable and shielding gas coverage uniform, from a full cylinder through to near empty.

Gas Regulator Selection Table

Start by identifying the gas, as each regulator is designed for a specific gas type. The table below shows the compatible applications for each COMET gas regulator. “VI” refers to a vertical inlet regulator and “SI” refers to a side inlet regulator, with the choice depending on how the regulator is mounted to the cylinder.

GasSuited ApplicationCOMET Regulator Part NumberMax outletCylinder inlet
OxygenOxy-fuel cutting, heating, brazingCOMET 700 Oxygen, VI (301637) or SI (310638); 400 kPa VI (310639)1,000 kPa (400 kPa on 310639)Oxygen
AcetyleneGas welding, cutting, heatingCOMET 700 Acetylene, VI (301532)150 kPaType 20
LPGOxy-LPG cutting, heating, brazingCOMET 500 LPG, SI (301525)400 kPaLPG
ArgonMIG and TIG shielding gasCOMET 500 Argon, VI (310601); Argon Preset (310602)45 L/min; 200 kPa PresetType 10
CO2MIG shielding gasCOMET 500 CO2, SI (310795)20 L/minType 30

The COMET 700 series also includes a Nitrogen (310801), Inert (310802) and Hydrogen (310803) regulator for purging and specialty work.

As a rule of thumb, the 700 PRO range suits demanding workshop and site environments, while the 500 PRO range covers everyday industrial applications.

Why Do Gas Threads and Colors Differ?

Each gas is supplied with a unique cylinder connection, ensuring that regulators can only be fitted to the gas they are designed to control. For example, acetylene and hydrogen cylinders use a left-hand (Type 20) thread, while CO₂ cylinders use a dedicated Type 30 connection. COMET regulators are also colour-coded by gas type, making it easy to identify the correct regulator.

The safety rule is straightforward: only use a regulator with the gas it is specifically designed for. If a regulator does not fit the cylinder connection, do not force it or use an adaptor. Always verify that the regulator label matches the cylinder contents before making a connection.

Pressure vs Flow: Understanding Shielding Gas Regulators

Oxygen and fuel regulators are typically adjusted by outlet pressure, measured in kPa, as torch tips and cutting nozzles are designed to operate at specific pressures. Shielding gas applications such as MIG and TIG welding work differently, as weld protection depends on gas flow rate rather than pressure. For this reason, COMET argon and CO₂ regulators are flow-rated, displaying output in litres per minute (L/min) to allow accurate flow control.

The COMET Argon Preset regulator (310602) provides a fixed outlet pressure of 200 kPa and is suited to systems where flow is controlled downstream using a separate flowmeter. For applications requiring flow adjustment directly at the cylinder, the flow-rated COMET 500 Argon regulator (310601) is the preferred option.

When using CO₂, additional safety precautions are required. As CO₂ can displace oxygen and create an asphyxiation hazard in confined spaces, regulators should only be installed and operated in well-ventilated areas. It is also important to note that the pressure relief valve fitted to a CO₂ regulator is designed to protect the regulator itself and should not be relied upon as a safety device for downstream equipment.

Common Regulator Applications in Australian Workshops

  • Farm and rural maintenance. Oxy-fuel equipment is commonly used for cutting steel, heating seized components, and straightening damaged parts in locations where electrical power may not be readily available. These applications typically require an oxygen regulator matched with either an acetylene or LPG regulator.
  • Fabrication and repair workshops. Cutting, heating, straightening, and gas welding operations depend on correctly matched oxygen and acetylene regulators to ensure safe and consistent performance.
  • MIG and TIG welding stations. Argon and CO₂ regulators are used to control shielding gas delivery, helping maintain weld quality by providing consistent gas flow and protecting the weld pool from contamination.
  • Mobile service vehicles. On-site cutting, brazing, and heating applications demand durable regulators capable of withstanding transport and harsh working conditions. COMET regulators feature rubber gauge guards to help protect gauges from accidental impacts.

When selecting a fuel gas, it is important to consider the intended application. LPG is well suited to cutting, heating, and brazing, while acetylene is required for oxy-fuel gas welding applications.

COMET Regulator Start-Up and Shutdown Procedures

This sequence follows the COMET operating manual. Read the full manual and your workplace safety procedures before you start.

  1. Remove the cylinder valve dust seal and crack the valve open briefly to clear dust. Point the outlet away from people and ignition sources and crack fuel gas valves only in a well-ventilated area.
  2. Check that the regulator label and the cylinder marking match. Tighten the inlet connection firmly with a suitable spanner, but not excessively.
  3. Connect the outlet hose. For oxy-fuel work, fit at least an AS 4603 flashback arrestor and non-return valve on each gas line. AS 4839 recommends fitting them at both the regulator and the torch.
  4. Wind the adjusting knob right out, stand to one side of the regulator and open the cylinder valve slowly. A sudden surge can damage the internal parts.
  5. With the downstream valves closed, turn the knob clockwise to roughly your working pressure, then check every connection for leaks with leak detection solution or soapy water. Never use a flame.
  6. Purge each line by opening one downstream valve at a time for several seconds (longer on long hoses), then close it before opening the next. Never purge oxidizing or flammable gases near a flame, lit cigarette or other ignition source.
  7. Open the torch or equipment valve and fine-tune the knob until the outlet gauge shows the pressure you need. The gauge only shows true working pressure with downstream valves open, so finish the setting with gas flowing.

When you finish, close the cylinder valve, open the downstream valves to drain the lines in a well-ventilated area away from ignition sources, then wind the adjusting knob out and close the valves again.

Three rules from the manual are worth repeating. Keep oil, grease and anything combustible away from oxygen regulators and fittings. Never use acetylene at a pressure above 150 kPa. And never use a regulator that isn’t made for oxygen in oxygen service.

If you’re starting from scratch, a kit saves you matching the parts yourself. The COMET Gas Kits pair COMET 700 regulators (plus a COMET 500 LPG regulator in the oxy-LPG kits) with a cutting torch or blowpipe set, flashback arrestors for the torch and regulator ends, fitted twin hose, nozzles or tips, goggles and a lighter, all in a hard case, and conform to AS 4839.

When to Service or Replace a Regulator

  • Five-year limit. The COMET manual says regulators, flashback arrestors, blowpipes, attachments, mixers and cutting torches must be refurbished or replaced after five years of service, as noted in AS 4839-2001.
  • Damage or contamination. Don’t use a regulator with broken, missing, worn, distorted or contaminated parts. Replace those parts, or the regulator, straight away.
  • Flashback arrestors. Have them inspected and tested by a competent person every 12 months, and have them inspected after any flashback.
  • Spare parts. Gauges, gauge guards, seat capsule assemblies, diaphragms and O-rings are listed in the COMET manual for the 700 and 500 ranges.
  • Warranty. CIGWELD covers gas regulators for 5 years, with shorter periods for seat assemblies and gauges (6 months) and elastomer seals and O-rings (3 months). Check the full terms in the manual.

COMET Regulator Features

COMET regulators conform to AS 4267. Across the range, internal gas control components are protected against flashback, and the gauges are designed to fail safe so no parts are thrown if a regulator fails. The 700 series adds a fully encapsulated Tri-Port seat with an integrated sintered filter, and rubber gauge guards for impact protection. Each unit is color coded by gas and laser engraved for identification and traceability.

Backed by 100+ years of CIGWELD expertise, the full range is on the COMET regulators page.

Frequently Asked Questions

Can I use an oxygen regulator on an acetylene cylinder?

No. Each gas has its own cylinder connection, and acetylene uses a left-hand thread, so the regulator won’t fit. The COMET manual says never to connect a regulator designed for one gas to a cylinder holding any other gas, and never to use a non-oxygen regulator in oxygen service.

What pressure should I set my acetylene regulator to?

Never above 150 kPa, which is also the maximum outlet of the COMET 700 acetylene regulator. Within that limit, set the pressure to suit your torch and tip using the tip manufacturer’s chart.

Do I need flashback arrestors on my regulators?

Yes, for oxy-fuel work. The COMET manual requires at least an AS 4603 flashback arrestor and non-return valve on each gas line, and AS 4839 says that for optimum protection they should be fitted at both the regulator and the torch. Have them inspected and tested by a competent person every 12 months.

How long does a gas regulator last?

The COMET manual says regulators must be refurbished or replaced after five years of service, as noted in AS 4839-2001. Replace one sooner if it is damaged, leaking or has contaminated parts.

Can I use an argon regulator for CO2?

No. Argon and CO2 have different cylinder connections (Type 10 and Type 30), and CO2 regulators are fitted with a pressure relief valve to protect the regulator. For CO2, use the COMET 500 CO2 regulator (310795).

What is the difference between the COMET 700 and COMET 500?

Both conform to AS 4267 and protect internal gas control components against flashback. The 700 PRO is built for demanding environments and has a fully encapsulated Tri-Port seat with a sintered filter. The 500 PRO covers everyday industrial applications. The 700 range covers oxygen, acetylene, nitrogen, inert and hydrogen, while the 500 range covers argon, LPG and CO2.

This guide is general information. Always follow the operating manual for your equipment and your workplace safety procedures.

Silicon Carbide (SiC) Inverter Welding Machines Explained: Benefits, Performance & Why They Matter

Silicon Carbide (SiC) Inverter Welding Machines Explained: Benefits, Performance & Why They Matter

In this article

Silicon carbide has become one of the more common terms on welder spec sheets over the past few years, usually printed next to the price tag as if it settles the argument on its own. It’s a fair thing to be sceptical about. Plenty of terms get used in marketing without much behind them.

Silicon carbide isn’t one of those. It’s a genuine improvement in how an inverter welder is built, and it has a real, measurable effect on how the machine performs. It just doesn’t matter equally to everyone, and it’s worth understanding what it does before deciding whether it’s worth paying extra for.

What silicon carbide actually is

Silicon carbide is a compound of silicon and carbon, and it’s not new. It’s one of the hardest synthetic materials available and has been used in grinding wheels and sandpaper for well over a century. Anyone who’s ground back a weld with a flap disc has almost certainly handled it without realising.

What’s changed more recently is the ability to grow silicon carbide into the pure crystal form needed for semiconductors and transistors, the small components that do the actual work inside an inverter power supply. Engineers found that silicon carbide made a noticeably better semiconductor material than plain silicon, which is what nearly every inverter welder has used since inverters replaced transformer machines decades ago.

That’s the essence of it: the same job, done with a better material. The rest of this comes down to why that swap makes a practical difference.

Where it sits inside the machine

Every inverter welder works on the same basic principle. It takes AC power from the wall, converts it to DC, then switches that DC on and off tens of thousands of times a second. That switched output then passes through a transformer, which steps it down to the low-voltage/high-current power an arc actually needs, before it’s sent out to the torch. The component doing the switching is a transistor, and how fast it can switch affects more than just itself: the faster the switching frequency, the smaller and lighter the transformer can be while doing the same job. That’s part of why SiC machines can end up more compact overall, not purely because the transistor runs cooler, but because everything downstream of it can shrink too.

In a conventional inverter, that switching is done by a silicon IGBT (Insulated Gate Bipolar Transistor). In a SiC inverter, it’s done by a silicon carbide MOSFET instead. The transformer, wire feed system, control board, and torch are still built on the same principles either way, but a machine genuinely engineered around SiC will typically pair the faster switch with a smaller transformer and lighter cooling to make the most of it. The transistor is what makes the improvement possible, but it’s the rest of the design working with it that actually delivers it in practice, a point worth keeping in mind, and one this article comes back to a little further down.

SiC vs the standard silicon inverter

 Regular inverter (silicon IGBT)SiC inverter (silicon carbide MOSFET)
Switching speedLimited by a residual current lag as the switch turns offFaster, without that lag
Heat generatedHigherLower
Operating temperatureRuns hotter under sustained loadStays cooler at the same output
Thermal ceiling before performance dropsLowerHigher
Size and weightBulky, with heavy and larger heatsinks for coolingSmaller with lighter cooling systems
Performance over long, high-amperage runsTends to fall awayHolds up more consistently

The underlying reason is a matter of material physics rather than manufacturing preference. In a silicon IGBT, a portion of the current lingers for a fraction of a second after the switch turns off, an effect engineers call tail current, and it’s what limits how quickly a silicon IGBT can switch and wastes energy as heat on every cycle.

That raises a reasonable question: ordinary MOSFETs don’t suffer from tail current the way IGBTs do, so why didn’t welding manufacturers just use plain silicon MOSFETs from the start? The answer comes down to current handling. A plain silicon MOSFET struggles to carry the higher currents a welding inverter needs without a real efficiency penalty, so despite the tail current drawback, silicon IGBTs became the standard choice for high-power inverters simply because they could handle that current better than a silicon MOSFET could.

Silicon carbide removes that trade-off rather than shifting it somewhere else. A SiC MOSFET switches the same clean way an ordinary MOSFET does, with no tail current, while still handling the higher voltage and current a welding inverter needs, which is exactly what plain silicon MOSFETs were never quite able to do at this scale. On top of that, silicon carbide can withstand a much higher electric field in a much smaller volume than silicon, and conducts heat away considerably more effectively. The result is a switch that’s fast, clean, and cooler, without giving up any current-handling capability to get there.

What it means for the person holding the torch

For all the changes inside the machine, they’re only useful if they translate into something noticeable at the work bench; and they do!

A steadier arc is one of the more immediate differences, particularly at lower amperage. Faster switching lets the machine respond to changes in the arc almost instantly, which shows up as a cleaner, more consistent bead, especially on thinner materials where an unstable arc becomes obvious quickly.

A better duty cycle follows on from that. Because the switching component isn’t wasting as much energy as heat, the machine’s internals stay cooler for longer under load, meaning less time spent waiting for it to cool before continuing.

That same reduction in heat also means manufacturers can build smaller, lighter machines without compromising on power. A large part of the bulk in a conventional inverter exists purely to manage heat; larger heatsinks and cooling fans. Since SiC semiconductors generate less heat to begin with, that hardware can shrink without the output shrinking with it, which matters for anyone regularly moving a machine between sites.

There’s a modest efficiency saving too. Less energy lost as heat means more of the power drawn from the wall actually goes into the weld, which adds up over time for a machine used daily in a fabrication setting.

And because silicon carbide tolerates higher operating temperatures before performance starts to drop off, machines built on it are less likely to throttle back on a genuinely hot day in a shed with no airflow, a fairly common Australian summer scenario for anyone welding outside an air-conditioned workshop.

When you’ll notice it, and when you won’t

For light or occasional welding, weekend projects, small home repairs, a well-built silicon inverter will do the job perfectly well, and the difference may not be noticeable at all. Silicon carbide earns its keep in a narrower set of circumstances:

  • Extended, high-output work such as structural fabrication, where a conventional inverter would ordinarily need to pause and cool.
  • Precision work on thin or heat-sensitive material, including aluminium panels, sheet metal, and thin-gauge stainless, where arc stability at lower amperage has a direct effect on weld quality.
  • Site work, where generator power, ambient heat, and machine reliability all carry more weight than they do in a controlled workshop environment.

The catch

Silicon carbide components remain more expensive to manufacture than plain silicon, and that cost is generally reflected in the price of the machine, though the gap has narrowed considerably as SiC production has scaled up across the industry. It’s also worth noting that the presence of silicon carbide alone doesn’t guarantee a better machine. The rest of the design needs to be built around it to realise the full benefit; simply substituting the component without adjusting the surrounding engineering delivers a smaller improvement than the specification sheet might suggest. It’s a detail worth judging machine by machine rather than assuming from the label.

Is it worth paying for?

For anyone welding professionally, running long sessions, working at higher amperage, or moving equipment between job sites regularly, the efficiency and heat advantages of silicon carbide tend to justify the additional cost fairly quickly. For lighter or occasional use, a well-constructed traditional inverter will still perform reliably, and the premium may not be necessary yet. As with most welding equipment decisions, the technology inside the machine matters less than the overall build quality and the warranty backing it.

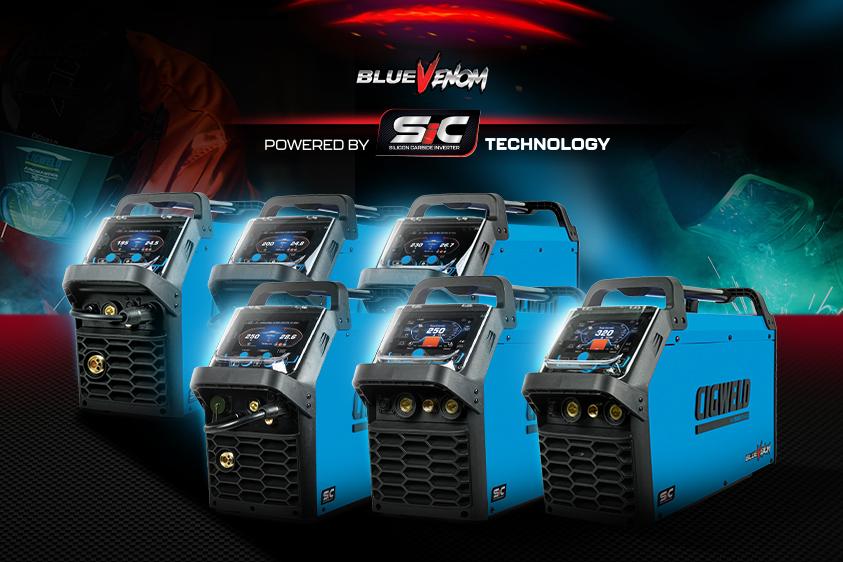
CIGWELD’s own BlueVenom SiC range is built around this exact technology, engineered specifically to take advantage of the faster switching and lower heat generation silicon carbide offers rather than simply swapping the component in. For anyone weighing up whether the step up is worth it for their own work, it’s a practical starting point to see the specs and duty cycle figures side by side against a conventional inverter.

FAQs

What does silicon carbide actually do in a welder?

It’s used to build the switching component inside the power supply, replacing the conventional silicon IGBT with a faster, cooler-running silicon carbide MOSFET. That change is what improves efficiency, arc stability, and duty cycle.

Is a silicon carbide welder genuinely better, or mostly marketing?

It’s a genuine improvement for sustained or high-output welding, delivering better efficiency, duty cycle, and arc stability. For light or occasional use, the difference compared with a good standard inverter is unlikely to be noticeable.

Why do silicon carbide welders cost more?

The components themselves are more expensive to manufacture, although prices have come down as more manufacturers adopt the technology. Over time, the cost is often offset through lower running costs, and reduced downtime.

Why is a faster switching speed better?

Faster switching lets the machine make finer, more frequent adjustments to the arc rather than broader, slower corrections, which is what produces a steadier arc and a cleaner bead. It also allows smaller transformers and other passive components to do the same job, since higher-frequency electronics can be physically smaller without losing performance, part of why faster-switching machines can end up lighter and more compact too.

Do I need a silicon carbide welder for home or hobby use?

Not generally. A solid standard inverter is well suited to occasional repairs or hobby projects. Silicon carbide becomes more relevant once welding is frequent, sustained, or done at higher amperage.

Does silicon carbide genuinely improve duty cycle?

Yes. Because it wastes significantly less energy as heat than a standard silicon IGBT, the internal components take longer to reach their thermal limit, allowing for longer welding sessions before the machine needs to cool.

Want to see one in person? Find your nearest CIGWELD stockist →
Transform Your Welding Shop with Cobot Welding: A Comprehensive Guide

Transform Your Welding Shop with Cobot Welding: A Comprehensive Guide

  • Cobots are a subset of programmable machines designed to perform tasks safely and effectively in a human environment.
  • They offer improved productivity, quality, and safety while reducing operating cost and worker injuries.
  • Cobots are easier to program than traditional robots and integrate seamlessly into existing workspaces without a need to modify the space for a larger robot. The smaller size makes cobots ideal for light-duty applications.

Understanding Cobot Welding and its Benefits

The growth of automation in manufacturing has been widely publicised over the past few decades, however, advancements in one specific task have captured our attention: industrial welding.

Industrial welding robots have existed for decades, so what makes the technology stand out today?

Is now a good time to purchase a robot welder?

To help you explore this type of investment, we will answer some common questions, review previous challenges, outline system components, touch on safety considerations, and discuss costs associated with owning a robot welder.

First, let us define the word ‘Cobot’, which was first introduced in 1996.

What is a Cobot?

The term ‘cobot’ is short for “collaborative robot”. Cobots are a subset of programmable machines designed to perform tasks safely and effectively in a human environment. Cobots can work next to people without modifying the shop floor or requiring a fenced-off area. Remember: “All Cobots are Robots, but not all Robots are Cobots”.

Collaborative robot welding, or ‘cobot welding’, is gaining traction because it can solve today’s toughest challenges in the most demanding environments, including industries with a high mix of low-volume parts. This allows for increased output and productivity – without more manpower– all within a small footprint. This is especially impactful for companies that are feeling the pinch of the welder shortage (which is everyone).

Traditional, non-collaborative robots are often referred to as “industrial robots”. Industrial robots are the large systems that are often used in the automotive industry, working around a car chassis without a single person nearby. Industrial robots require highly trained programmers and extensive systems investments. In today’s tight labor market, this simply means you will substitute the challenge of hiring a skilled tradesperson with the obstacle of hiring multiple skilled robot programmers.

Benefits of Cobot Welding

Robots can make your life easier, as long as you’re matched to the right type of system. For businesses where large industrial robot installations are cost-prohibitive, cobots may be the ideal solution. These businesses find that cobot welding systems are both cost-effective and easy to install.

There are numerous benefits to integrating cobot welding into your production process, including but not limited to:

  1. Increased productivity: Cobots can operate with a repeatable operation time, making it easier to schedule the upstream and downstream steps in the value stream.
  2. Improved quality: Cobots produce repeatable high-quality welds.
  3. Enhanced safety: The integrated safety features decrease the risk of workplace accidents.
  4. Reduced cost: With the ability to perform tasks accurately, cobots can significantly decrease rework and repair costs.
  5. Decreased injuries: With cobots shouldering repeatable tasks, the risk of repetitive strain injuries (RSI) or overuse fatigue decreases.

We receive many questions about the transition away from manual welding. Many of these questions revolve around initial investment costs, setup time, training, and the implications for their existing team members.

Frankly, all questions are the right questions to ask.

We will touch on a few of these questions in this article. If you have more questions or want to read more, our ESAB University has articles, videos, blog articles, and more that you can explore.

Cobot Welding Vs. Traditional Robotic Welding: What’s the Difference?

The traditional industrial welding robot operates inside of its own caged ‘box’ and does not interact with humans at any time. In lean manufacturing, these isolated areas are called “process monuments”.

Process monuments are difficult to move or integrate into one-piece flow value streams. The most cost-effective production is high-volume, low-mix (HMLV) manufacturing. On the other hand, cobot welders are easy to move and reprogram because they occupy a small footprint and can mount (or remount) almost anywhere. They are redeployed as the production backlog changes and different equipment needs to be utilized.


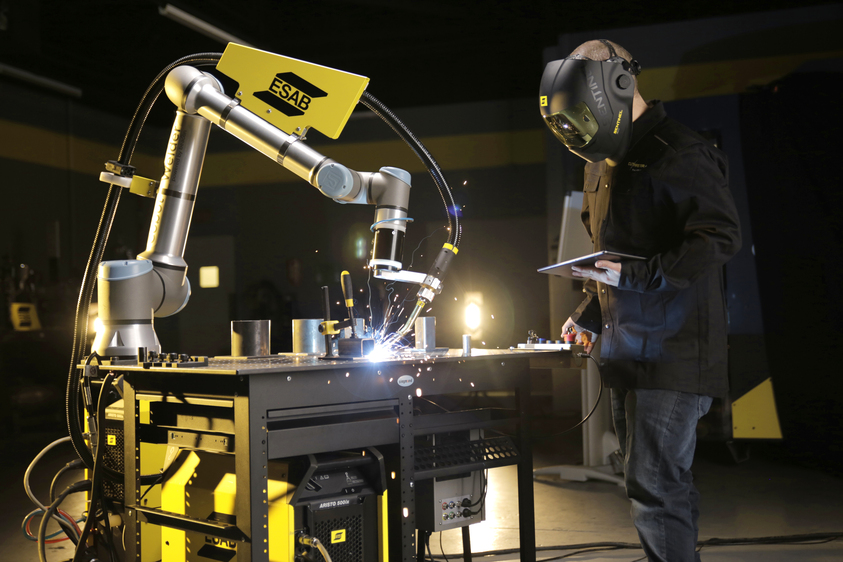
Figure 1: ESAB Cobot welder in operation


  Cobot Welding Traditional Robotic Welding
Ease of programming Cobots are designed to be used by manufacturing, technical, or process experts, not someone with years of coding experience. They often support user-friendly and intuitive interfaces to assist with programming the robot. Cobots are a compact solution that can be moved to the next task. Programming traditional robotic systems requires advanced coding skills to support the installation and upkeep of the robot. The code used depends on the robot manufacturer and requires weeks (if not months) to master.
Payload and Speed Cobots operate at lower speeds and payloads for light-duty applications that encourage human collaboration. Traditional industrial robotic systems operate at higher payloads and speeds, which is ideal for heavy-duty and fast-paced operation. These factors do not promote close human proximity.
Safety Cobots are designed with the assumption that a person could come in contact with the robot at any time. Safety functions inherent to the cobot employ sensors to monitor the motion, speed, force, and power of the cobot relative to a person’s proximity. If risk assessments are done correctly, traditional guards or protective devices are not needed to maintain functional safety. Traditional industrial welding robots are designed with the assumption that a person would never enter into the restricted zone at any time during operation. As a result, these robots operate at high speeds and force. Compliance with current safety standards must be maintained, including but not limited to physical barriers, safety scanners, and emergency stops.
Cost The initial investment of the cobot may be higher. However, installation costs are consistently lower when accounting for the lack of specialized safety infrastructure. Operating costs are lower due to their ability to perform diverse tasks. Cobots also require less training and certification to program the robot. The initial investment cost seems low when assessing the robot alone. However, additional safety infrastructure must be accounted for in the investment. Additionally, operations must determine the process to bring materials to and from the robot cell. Dedicated programming and maintenance resources are required to maintain the whole system.
Workspace Cobots are designed to work in a human environment. This means the cobot is installed at the original workstation. Modifications to accommodate a large robot and its associated safety barriers are not required since the footprint of the cobot is significantly smaller. Traditional robots are isolated with plenty of space and physical safety barriers. Depending on the size, the robot may have significant electrical and weight demands on the facility. As a result, the robot system requires significant floor space and pressure on the infrastructure. Inputs and outputs are moved in and out of the area in batches.

It is important to note that the choice between a cobot welder and a traditional robot welder is not a matter of which is ‘better’ overall, but rather which is better suited to your specific operational needs and constraints.

The Upside to Programming A Cobot

Figure 2: Welding cobot programming example

Traditional robot welding systems are often marked by complex and intricate coding requirements. They may use Python, C++, or their proprietary programming language developed from other languages. Training is focused on learning the code that is specific to the robot. These systems necessitate a high level of expertise and lengthy programming periods before they can fully function. Additionally, any changes in the process (i.e. welding on a new shape) require new code, meaning operational downtime.

The majority of robot programming is done through a hand-held “teach box” or “teach pendant”. This enables the user to communicate with the robot to program, test, and troubleshoot. Cobot welding stands out from other types of machines due to its programming simplicity. Unlike industrial robots, the programmer interacts with a visual representation of the code instead of the raw code. This means that a broader audience can program and reprogram the robot with a fraction of the downtime.

How to Program a Welding Cobot

There are many different welding cobots on the market, but in general, they follow the same workflow. Here is a simple step-by-step example of how to teach a welding cobot:

  1. Create a New Program: Create a new program for a part or an assembly.
  2. Set the welding parameters: Define the welder’s settings, such as amperage, arc length, wire speed, torch angle.
  3. Position the Cobot: Manually position the cobot arm to the desired starting point of the weld.
  4. Record Points: Use the teach pendant to record the start and end points of the weld. Record any intermediate points.
  5. Playback: Watch as the cobot repeats the recorded points. Adjust the speed and fine-tune the positions as required.
  6. Repeat: Repeat the process for each new weld path.

Note: While cobot welding systems are designed to be intuitive, training may be required to become proficient in their use. It is also important to adhere to safety protocols when working with any robots, including cobots.

Benefits of Easy Programming

Now that we have reduced (can we say eliminated?) the programming barrier, let us review a few of the measurable benefits of these cobot welders.

  1. Reduced Downtime: Fast and simple programming means less time spent on setting up the robot, resulting in decreased downtime and increased production.
  2. Improved Flexibility: The ease of programming allows for quick adjustments on the cobot, making it adaptable to changing and adding to its task list.
  3. Lowered Barrier to Entry: With anyone able to learn cobot programming, the barrier to entry for small to medium-sized businesses has been eliminated.

To summarize, while traditional robot welding has its strengths, the ease of programming, flexibility, and safety of cobot welding make it a compelling option for fabricators of all sizes. It is important to note that successful implementation depends on a variety of factors, such as the nature of the welding tasks, the skill level of the workforce, and the specific production demands of the business. This is where the experts of ESAB can help. If you have a specific group of tasks in mind, contact us here.

Components of a Cobot Welding System

The cobot welding system combines a collaborative robotic arm and the welding equipment. The arm, often equipped with a welding torch, follows set paths to execute welding tasks. Its precision ensures accuracy and consistency in the process. The welding equipment supplies power and materials like welding wire or shielding gas. These components form an effective and safe collaborative welding system.

A cobot welding cell comprises several integral components. These include:

  • The cobot arm, its controller and its teach pendant.
  • A welding power source.
  • Welding equipment, including a welding torch, wire feeder, and shielding gas supply.
  • PPE to protect both the cobot and human operators (similar to manual welding).

Safety Considerations When Implementing Cobot Welding

Welding Safety

Cobot welders are fun to work with, but we must take the time to highlight a few safety considerations. Robotic welding, like manual welding, presents certain potential hazards that must be mitigated to ensure the well-being of the human workforce. Appropriate safety measures should be taken to eliminate or reduce the risk of injury or damage to equipment. Despite the inherent safety design of cobots, particular attention must be paid to creating a safe and efficient welding environment. This includes but is not limited to:

  • Physical Hazards: Eliminate all preventable collisions or unwanted contact with the welding equipment
  • Electrical Hazards: Maintain proper safety protocols to prevent electrical shock, fire, and explosion.
  • Chemical and Fume Hazards: While the cobot is unable to breathe in metallic oxides, silicates, and fluorides, it is important to ensure the humans in the area are wearing the appropriate PPE and maintain adequate ventilation in the workspace.

Risk Assessment

All robot installations must conduct a thorough risk assessment, which is a formal process to ensure the robot integration is safe to use. The risk assessments document and quantify the hazards and selected solutions. For cobots, collaborative robot safety standards ISO-10218 and TS-15066 apply. ISO-10218 describes safety requirements for industrial robots, while TS-15066 supplements this standard with guidance for industrial-only cobot systems and workplace safety.

OSHA outlines some examples and best practices for conducting an effective risk assessment (RA). For each action (task) there is an associated hazard, calculated risk level, documented safety solution, and new risk level. The output of the assessment is the required safety function and the functional risk reduction measures for each function. An excerpt from an example Risk Assessment is shown below.

Figure 4: Risk assessment example from OSHA

Risk assessments should be periodically reviewed and validated. A risk assessment will show the solution but will not capture the status of that action. This is why a task list (or action list) should be an output of the RA. The task list will assign a person and a due date to each task. The task list should be reviewed with scheduled frequency to ensure all actions are completed on time.

The Cost of Cobot Welding: A Breakdown

The cost of a cobot welding system can be divided into three main categories: acquisition, programming, and maintenance costs. Cobot training would be needed, but consumes only hours of a technician’s time (vs. weeks).

Acquisition Costs The acquisition cost is the initial purchase of the cobot, welding equipment, and the necessary peripherals. This cost can vary widely depending on the robot platform. Contact the ESAB Team to inquire about the costs of a welding cobot.
Programming Costs Cobot welders are known for their seamless programming process. This advantage removes the need for skilled programming or attending time-consuming training, significantly reducing cost.
Maintenance Costs Cobot systems tend to have lower maintenance costs than traditional robotic systems due to their simpler design and construction. The robot maintenance includes costs related to the upkeep of safety measures, which are generally lower for cobot systems due to their inherent focus on operator safety.

Potential Returns on Investment

For shop owners, the decision to invest in a cobot welder should not solely be driven by the initial cost/benefit calculation, but rather by the ongoing return on investment. The labor crunch we are experiencing today is expected to get worse.

The American Welding Society estimates that by 2024 there will be a shortage of 400,000 welders here in the US.  Canada expects openings and job seeker number to remain similar, projecting the current welder shortage to extend through the next five years at least. To make things worse, the average age of a welder in the US is 55. It is no surprise that small and medium enterprises (SMEs) are also looking to invest in cobot welding solutions.

Here are a few ROI’s that our customers have highlighted:

  • Increased Productivity: Cobot welding systems are well known for their efficiency. They can operate 24/7, effectively bypassing human limitations such as fatigue. This can significantly increase the fabricator’s output, leading to higher revenues and profitability.
  • Reduced Errors and Rework: Unlike humans, Cobots are not prone to making errors due to distraction, fatigue, or inexperience. This leads to a repeatable high-quality output and reduces the costs related to rework and waste.
  • Lower Labor Costs: Cobots do not eliminate people, they assist them. Cobots allow the operator to focus on more complex tasks, thereby increasing production. This means a higher hourly production rate with the same (or lower) labor cost.
  • Enhanced Safety: Cobot welding systems are designed with operator safety in mind, reducing the risk of workplace accidents. Worker fatigue increases the risk of accidents, but consistent cobot operation enables a consistent, safe environment. This can result in lower insurance premiums and compensation payouts.

While the initial investment of a cobot is like any other machine purchase, the long-term financial benefits of adopting cobot welding systems can be substantial. Investing in Cobot welding systems can be a strategic move for fabricators, facilitating enhanced productivity, higher quality output, cost savings, and improved safety. It is the long-term benefits that should be the focus when considering the return on investment.

Figure 5: ESAB Cobot at Skyvington Manufacturing Inc.

More small businesses, such as Skyvington Manufacturing Inc., are adopting cobot welders as their backlog grows. Skyvington Manufacturing Inc. is a 30-person shop in Mississauga, Ontario, Canada that turned to a cobot welding solution when its backlog kept getting longer. President Brett Skyvington explains their rationale:

“One of the reasons I looked for the cobot was that our welding department was booked out for five weeks solid, and customer lead times were getting pushed out.”

After a month of using a cobot welder, the cobot made over 25,000 welds and tackled a large order for the company.

“The cobot allows us to achieve our quality standards and produce in a timely fashion, at a cost-effective rate. That’s really what we strive for as a company,” says Skyvington.

Conclusion

There is a lot to consider as you investigate a cobot welder. All of your questions are the right questions. We recognize that you may be considering changes due to difficulty hiring experienced welders, the pressures of a growing backlog, or the desire to expand into additional industrial segments.

In this article, we answered some common questions, reviewed challenges, outlined system components, touched on safety considerations, and discussed costs associated with owning a robot welder.

The easiest way to know whether cobot welding could help is to reach out for a virtual demo. At ESAB, we have been in business for over 100 years and have solved many of these challenges for our client partners. We can support you in your next steps. When you are ready to discuss your project, contact us here.

Cobot Welding FAQ

How fast can a cobot welding system weld?

The complexity of the task can vary widely. On average, a cobot welder can weld at a speed of about 20 to 30 inches per minute. However, it’s not only about speed. Some of the benefits of a cobot welding system are the precision, consistency, and ability to operate around the clock.

Can I teach a welding cobot even though I do not have experience in programming or robotics?

Yes! Programming a welding cobot is different from coding a robot. You do not need to have any coding experience when teaching a cobot. Cobots have intuitive user interfaces (including phone apps) that simplify the programming process.

Request a virtual demo to see how this works.

How can I get started with a cobot welder?

First, contact us or request a demo. We will collaborate with you to determine the right size system for you. We will also get you started by sharing installation, startup, and training procedures developed by our team.

I operate a small shop. Can I still use a cobot welder?

Yes! Cobot welders are ideal for small-scale welding operations. Their compact size and flexible programming capabilities make them perfect for welding tasks in smaller workspaces. You can easily integrate the cobot into existing welding setups, allowing small-scale fabricators like you to automate their welding processes without significant infrastructure changes.

Welding Safety Tips for Industrial and Home Projects

Welding Safety Tips

Essential Welding Safety Guide: From Workshop to Home Projects

Whether you’re working in a professional setting or tackling DIY projects, understanding and implementing proper welding safety tips is crucial for protecting yourself and those around you. At Cigweld, your safety is our top priority. Let’s dive into essential safety practices that we think every welder should know.

The Foundation of Safe Welding Practices

Before striking an arc, it’s vital to understand that welding safety begins with proper preparation. Workshop safety tips start with creating a clean, organised workspace free from flammable materials. Whether you’re in an industrial facility or focusing on garage welding safety, these fundamental principles remain the same.

Essential Welding Safety Equipment

Eye & Face Protection

Your eyes and face need maximum protection from arc radiation and spatter. An arc is not just a very bright light; it’s actually electromagnetic energy that can cause photokeratitis — essentially sunburn of the eye. A quality welding helmet safety system is non-negotiable. Modern auto-darkening helmets with appropriate welding lenses provide superior protection while improving visibility and comfort. Always wear welding safety glasses under your helmet for additional protection when grinding or performing other related tasks.

Hand & Body Protection

Quality welding gloves provide protection from heat, sparks, and UV radiation. Our range of ESAB welding gloves features options with premium cow-grain leather and Kevlar stitching for superior protection and durability.
While your hands are a welder’s most important tool, you should also protect your whole body from UV and sparks. Proper welding protective clothing should include:

  • Fire-resistant long-sleeve jacket or coat
  • Heavy-duty, cuff-less trousers
  • Steel-toed boots
  • Flame-resistant gauntlet gloves
  • Hearing protection for high-noise environments

Failure to protect your hands and body from the welding arc can result in burns — ranging from light sunburn-like discomfort to 2nd and 3rd-degree burns from molten metal. Don’t forget, there’s also the possibility of injury from slicing, cutting and tearing, as with any mechanical process.

Essential Welding PPE Checklist

We’ve spent some time talking about safe welding practices, what kinds of welding protection you should be wearing, and why. To make things even simpler, we’ve collated these tips into one checklist. Before starting any welding project, ensure you have:

  • Auto-darkening welding helmet with appropriate shade settings
  • Safety glasses with side shields
  • Flame-resistant clothing covering all exposed skin
  • Heavy-duty welding gloves
  • Steel-toed safety boots
  • Respirator when working with galvanized materials or in confined spaces
  • Hearing protection when working in noisy environments

Creating a Safe Workspace

Welding workspace safety is crucial whether you’re in an industrial setting or working from home. For industrial welding safety, ensure:

  • Proper ventilation systems are in place
  • Fire extinguishers are readily accessible
  • First aid kits are fully stocked and easily reached
  • Emergency procedures are clearly posted
  • Work areas are clean and free from tripping hazards

Home Welding Safety Considerations

When setting up for home welding safety, implement these workshop safety tips:

  • Designate a specific area in your workshop for welding, away from flammable materials
  • Install proper ventilation
  • Keep a Class C fire extinguisher within reach (usually a dry chemical powder extinguisher)
  • Use welding curtains or screens to protect others
  • Store equipment and materials safely when not in use
  • Make sure family members know not to enter the workshop while you’re welding

Special Considerations for Different Environments

Industrial Settings

Industrial welding safety requires additional considerations:

  • Follow all workplace safety protocols
  • Be aware of others working nearby
  • Know emergency procedures and exit routes
  • Maintain proper documentation of safety checks
  • Regular equipment inspections

Home Workshop

For safe home projects, remember:

  • Never weld alone
  • Keep a phone nearby for emergencies
  • Ensure proper electrical grounding
  • Store gas cylinders properly
  • Keep your workspace clean and organised

Maintaining Your Safety Equipment

Regular maintenance of your welding safety equipment is crucial:

  • Clean your helmet’s lens daily
  • Inspect gloves for holes or wear
  • Check all cables and connections before use
  • Replace damaged PPE immediately
  • Keep spare lenses and consumables on hand

The Know-How You Need

Remember, proper safety might start with high-quality PPE, but it isn’t just about having the right equipment — it’s about developing good habits and maintaining awareness. Whether you’re a professional welder or a DIY enthusiast, these welding safety tips will help protect you and those around you.

For more information about our range of safety equipment or specific guidance for your welding projects, contact our helpful team of experts at 1300 654 674, email us on enquiries@cigweld.com.au,  or visit your local Cigweld distributor.

Stay safe, and happy welding!

Store Locator

Find your nearest CIGWELD ESAB distributor or service agent.. Search by postcode or suburb to locate trusted partners who stock our products and support our full range of welding solutions.